Tuesday 26 February 2013

Progress bar and downloading a file in Android


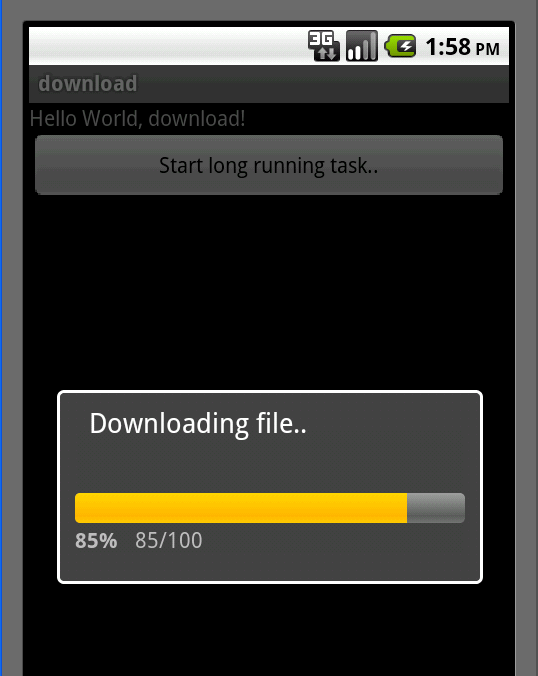
This sample android program shows you how to show Progress Bar in Android. In this program many concepts are explained. A button is shown and when clicked, a big file is downloaded from flickr. The downloaded file is saved to the sdcard in the android phone. While the download is still in progress, a progress bar is shown with the actual percentage of download. So the code below explains, downloading a file from a server, saving a file to the sdcard and showing a progress bar all in one android program.
The download.java file is as follows:
package com.javasamples;

import java.io.BufferedInputStream;
import java.io.FileOutputStream;
import java.io.InputStream;
import java.io.OutputStream;
import java.net.URL;
import java.net.URLConnection;

import android.app.Activity;
import android.app.Dialog;
import android.app.ProgressDialog;
import android.os.AsyncTask;
import android.os.Bundle;
import android.util.Log;
import android.view.View;
import android.view.View.OnClickListener;
import android.widget.Button;

public class download extends Activity {
   
    public static final int DIALOG_DOWNLOAD_PROGRESS = 0;
    private Button startBtn;
    private ProgressDialog mProgressDialog;
   
    /** Called when the activity is first created. */
    @Override
    public void onCreate(Bundle savedInstanceState) {
        super.onCreate(savedInstanceState);
        setContentView(R.layout.main);
        startBtn = (Button)findViewById(R.id.startBtn);
        startBtn.setOnClickListener(new OnClickListener(){
            public void onClick(View v) {
                startDownload();
            }
        });
    }

    private void startDownload() {
        String url = "http://farm1.static.flickr.com/114/298125983_0e4bf66782_b.jpg";
        new DownloadFileAsync().execute(url);
    }
    @Override
    protected Dialog onCreateDialog(int id) {
        switch (id) {
  case DIALOG_DOWNLOAD_PROGRESS:
   mProgressDialog = new ProgressDialog(this);
   mProgressDialog.setMessage("Downloading file..");
   mProgressDialog.setProgressStyle(ProgressDialog.STYLE_HORIZONTAL);
   mProgressDialog.setCancelable(false);
   mProgressDialog.show();
   return mProgressDialog;
  default:
   return null;
        }
    }

class DownloadFileAsync extends AsyncTask<String, String, String> {
   
 @Override
 protected void onPreExecute() {
  super.onPreExecute();
  showDialog(DIALOG_DOWNLOAD_PROGRESS);
 }

 @Override
 protected String doInBackground(String... aurl) {
  int count;

 try {

 URL url = new URL(aurl[0]);
 URLConnection conexion = url.openConnection();
 conexion.connect();

 int lenghtOfFile = conexion.getContentLength();
 Log.d("ANDRO_ASYNC", "Lenght of file: " + lenghtOfFile);

 InputStream input = new BufferedInputStream(url.openStream());
 OutputStream output = new FileOutputStream("/sdcard/some_photo_from_gdansk_poland.jpg");

 byte data[] = new byte[1024];

 long total = 0;

  while ((count = input.read(data)) != -1) {
   total += count;
   publishProgress(""+(int)((total*100)/lenghtOfFile));
   output.write(data, 0, count);
  }

  output.flush();
  output.close();
  input.close();
 } catch (Exception e) {}
 return null;

 }
 protected void onProgressUpdate(String... progress) {
   Log.d("ANDRO_ASYNC",progress[0]);
   mProgressDialog.setProgress(Integer.parseInt(progress[0]));
 }

 @Override
 protected void onPostExecute(String unused) {
  dismissDialog(DIALOG_DOWNLOAD_PROGRESS);
 }
}
}
The output of this program will be as shown in the android emulator below.
The main.xml file in your res/layout folder is as follows:
<?xml version="1.0" encoding="utf-8"?>
<LinearLayout
 xmlns:android="http://schemas.android.com/apk/res/android"
 android:orientation="vertical"
 android:layout_width="fill_parent"
 android:layout_height="fill_parent">
 <TextView
  android:layout_width="fill_parent"
  android:layout_height="wrap_content"
  android:text="@string/hello" />
 <Button
  android:text="Start long running task.."
  android:id="@+id/startBtn"
  android:layout_width="fill_parent"
  android:layout_height="wrap_content">
 </Button>
</LinearLayout>

Voice Recognition & Text to speech Android


How to implement voice recognition

With your blank project setup, you should have an AndroidManifest file like the following


<?xml version="1.0" encoding="utf-8"?>
<manifest xmlns:android="http://schemas.android.com/apk/res/android"
      package="com.jameselsey"
      android:versionCode="1"
      android:versionName="1.0">
    <application android:label="VoiceRecognitionDemo" android:icon="@drawable/icon"
            android:debuggable="true">
        <activity android:name=".VoiceRecognitionDemo"
                  android:label="@string/app_name">
            <intent-filter>
                <action android:name="android.intent.action.MAIN" />
                <category android:name="android.intent.category.LAUNCHER" />
            </intent-filter>
        </activity>
    </application>
</manifest>
 
And have the following in res/layout/voice_recog.xml :


<?xml version="1.0" encoding="utf-8"?>
<LinearLayout xmlns:android="http://schemas.android.com/apk/res/android"
    android:layout_width="fill_parent"
    android:layout_height="fill_parent"
    android:orientation="vertical">
 
    <TextView
        android:layout_width="fill_parent"
        android:layout_height="wrap_content"
        android:paddingBottom="4dip"
        android:text="Click the button and start speaking" />
 
    <Button android:id="@+id/speakButton"
        android:layout_width="fill_parent"
        android:onClick="speakButtonClicked"
        android:layout_height="wrap_content"
        android:text="Click Me!" />
 
    <ListView android:id="@+id/list"
        android:layout_width="fill_parent"
        android:layout_height="0dip"
        android:layout_weight="1" />
 
 </LinearLayout>
And finally, this in your res/layout/main.xml : 

<?xml version="1.0" encoding="utf-8"?>
<LinearLayout xmlns:android="http://schemas.android.com/apk/res/android"
    android:orientation="vertical"
    android:layout_width="fill_parent"
    android:layout_height="fill_parent"
    >
<TextView
    android:layout_width="fill_parent"
    android:layout_height="wrap_content"
    android:text="VoiceRecognition Demo!"
    />
</LinearLayout>
 
 
So thats your layout and configuration sorted. It will provide us with a button to start the voice recognition, and a list to present any words which the voice recognition service thought it heard. Lets now step through the actual activity and see how this works.
You should copy this into your activity :


package com.umer;
 
import android.app.Activity;
import android.os.Bundle;
import android.content.Intent;
import android.content.pm.PackageManager;
import android.content.pm.ResolveInfo;
import android.speech.RecognizerIntent;
import android.view.View;
import android.widget.ArrayAdapter;
import android.widget.Button;
import android.widget.ListView;
import java.util.ArrayList;
import java.util.List;
 
/**
 * A very simple application to handle Voice Recognition intents
 * and display the results
 */
public class VoiceRecognitionDemo extends Activity
{
 
    private static final int REQUEST_CODE = 1234;
    private ListView wordsList;
 
    /**
     * Called with the activity is first created.
     */
    @Override
    public void onCreate(Bundle savedInstanceState)
    {
        super.onCreate(savedInstanceState);
        setContentView(R.layout.voice_recog);
 
        Button speakButton = (Button) findViewById(R.id.speakButton);
 
        wordsList = (ListView) findViewById(R.id.list);
 
        // Disable button if no recognition service is present
        PackageManager pm = getPackageManager();
        List<ResolveInfo> activities = pm.queryIntentActivities(
                new Intent(RecognizerIntent.ACTION_RECOGNIZE_SPEECH), 0);
        if (activities.size() == 0)
        {
            speakButton.setEnabled(false);
            speakButton.setText("Recognizer not present");
        }
    }
 
    /**
     * Handle the action of the button being clicked
     */
    public void speakButtonClicked(View v)
    {
        startVoiceRecognitionActivity();
    }
 
    /**
     * Fire an intent to start the voice recognition activity.
     */
    private void startVoiceRecognitionActivity()
    {
        Intent intent = new Intent(RecognizerIntent.ACTION_RECOGNIZE_SPEECH);
        intent.putExtra(RecognizerIntent.EXTRA_LANGUAGE_MODEL,
                RecognizerIntent.LANGUAGE_MODEL_FREE_FORM);
        intent.putExtra(RecognizerIntent.EXTRA_PROMPT, "Voice recognition Demo...");
        startActivityForResult(intent, REQUEST_CODE);
    }
 
    /**
     * Handle the results from the voice recognition activity.
     */
    @Override
    protected void onActivityResult(int requestCode, int resultCode, Intent data)
    {
        if (requestCode == REQUEST_CODE && resultCode == RESULT_OK)
        {
            // Populate the wordsList with the String values the recognition engine thought it heard
            ArrayList<String> matches = data.getStringArrayListExtra(
                    RecognizerIntent.EXTRA_RESULTS);
            wordsList.setAdapter(new ArrayAdapter<String>(this, android.R.layout.simple_list_item_1,
                    matches));
        }
        super.onActivityResult(requestCode, resultCode, data);
    }
}


Text to speech simple example

package com.aviyehuda.android.text2speech;

import android.app.Activity;
import android.os.Bundle;
import android.speech.tts.TextToSpeech;
import android.speech.tts.TextToSpeech.OnInitListener;

public class Text2SpeechTest extends Activity implements OnInitListener {
 
 TextToSpeech talker;
 
    @Override
    public void onCreate(Bundle savedInstanceState) {
        super.onCreate(savedInstanceState);
        setContentView(R.layout.main);
        talker = new TextToSpeech(this, this);
    }
    
    public void say(String text2say){
     talker.speak(text2say, TextToSpeech.QUEUE_FLUSH, null);
    }

 @Override
 public void onInit(int status) {
  
  say("Hello World");
  
 }
 
 @Override
 public void onDestroy() {
  if (talker != null) {
   talker.stop();
   talker.shutdown();
  }

  super.onDestroy();
 }
}

Barcode Scanner by using Zxing


Source for main.xml screen layout


<?xml version="1.0" encoding="utf-8"?>
<LinearLayout xmlns:android="http://schemas.android.com/apk/res/android"
    android:layout_width="fill_parent"
    android:layout_height="fill_parent" android:orientation="vertical" android:layout_gravity="center">
<TextView
    android:layout_width="fill_parent"
    android:layout_height="wrap_content"
    android:text="@string/hello"
    android:gravity="center" android:textSize="25sp"/>
<Button android:text="Scan QR Code" android:id="@+id/scanner" android:layout_width="wrap_content" android:layout_height="wrap_content" android:gravity="center" android:layout_gravity="center_horizontal"></Button>
<Button android:text="Scan BAR Code" android:id="@+id/scanner2" android:layout_width="wrap_content" android:layout_height="wrap_content" android:gravity="center" android:layout_gravity="center_horizontal"></Button>
</LinearLayout>

Source for AndroidScanner.java program for barcode scanning


package com.as400samplecode;

import android.app.Activity;
import android.content.ActivityNotFoundException;
import android.content.Intent;
import android.os.Bundle;
import android.util.Log;
import android.view.Gravity;
import android.view.View;
import android.view.View.OnClickListener;
import android.widget.Button;
import android.widget.Toast;

public class AndroidScanner extends Activity {
    /** Called when the activity is first created. */
    @Override
    public void onCreate(Bundle savedInstanceState) {
        super.onCreate(savedInstanceState);
        setContentView(R.layout.main);
      
        try {
            Button scanner = (Button)findViewById(R.id.scanner);
            scanner.setOnClickListener(new OnClickListener() {
              
                public void onClick(View v) {
                    Intent intent = new Intent("com.google.zxing.client.android.SCAN");
                    intent.putExtra("SCAN_MODE", "QR_CODE_MODE");
                    startActivityForResult(intent, 0);
                }

            });
          
            Button scanner2 = (Button)findViewById(R.id.scanner2);
            scanner2.setOnClickListener(new OnClickListener() {
              
                public void onClick(View v) {
                    Intent intent = new Intent("com.google.zxing.client.android.SCAN");
                    intent.putExtra("SCAN_MODE", "PRODUCT_MODE");
                    startActivityForResult(intent, 0);
                }

            });
          
        } catch (ActivityNotFoundException anfe) {
            Log.e("onCreate", "Scanner Not Found", anfe);
        }
      
    }
  
    public void onActivityResult(int requestCode, int resultCode, Intent intent) {
        if (requestCode == 0) {
            if (resultCode == RESULT_OK) {
                String contents = intent.getStringExtra("SCAN_RESULT");
                String format = intent.getStringExtra("SCAN_RESULT_FORMAT");
                // Handle successful scan
                Toast toast = Toast.makeText(this, "Content:" + contents + " Format:" + format , Toast.LENGTH_LONG);
                toast.setGravity(Gravity.TOP, 25, 400);
                toast.show();
            } else if (resultCode == RESULT_CANCELED) {
                // Handle cancel
                Toast toast = Toast.makeText(this, "Scan was Cancelled!", Toast.LENGTH_LONG);
                toast.setGravity(Gravity.TOP, 25, 400);
                toast.show();
              
            }
        }
    }

}

TIP: You can make your application check for existence of the Zxing application. 

See IntentIntegrator for a possibly easier way to integrate. In particular this will handle the case where Barcode Scanner is not yet installed. Click on the link below for more details


Sample code from IntentIntegrator.java

private static final String PACKAGE = "com.google.zxing.client.android";

catch (ActivityNotFoundException e) {
      return showDownloadDialog(activity, stringTitle, stringMessage, stringButtonYes, stringButtonNo);
    }

private static AlertDialog showDownloadDialog(final Activity activity,
                                                CharSequence stringTitle,
                                                CharSequence stringMessage,
                                                CharSequence stringButtonYes,
                                                CharSequence stringButtonNo) {
    AlertDialog.Builder downloadDialog = new AlertDialog.Builder(activity);
    downloadDialog.setTitle(stringTitle);
    downloadDialog.setMessage(stringMessage);
    downloadDialog.setPositiveButton(stringButtonYes, new DialogInterface.OnClickListener() {
      public void onClick(DialogInterface dialogInterface, int i) {
        Uri uri = Uri.parse("market://search?q=pname:" + PACKAGE);
        Intent intent = new Intent(Intent.ACTION_VIEW, uri);
        try {
          activity.startActivity(intent);
        } catch (ActivityNotFoundException anfe) {
          // Hmm, market is not installed
          Log.w(TAG, "Android Market is not installed; cannot install Barcode Scanner");
        }
      }
    });
    downloadDialog.setNegativeButton(stringButtonNo, new DialogInterface.OnClickListener() {
      public void onClick(DialogInterface dialogInterface, int i) {}
    });
    return downloadDialog.show();
  }

More information on Zxing scanner application


According to ZXing (pronounced "zebra crossing") is an open-source, multi-format 1D/2D barcode image processing library implemented in Java, with ports to other languages. Our focus is on using the built-in camera on mobile phones to scan and decode barcodes on the device, without communicating with a server. However the project can be used to encode and decode barcodes on desktops and servers as well. We currently support these formats:

  • UPC-A and UPC-E
  • EAN-8 and EAN-13
  • Code 39
  • Code 93
  • Code 128
  • QR Code
  • ITF
  • Codabar
  • RSS-14 (all variants)
  • Data Matrix
  • PDF 417 ('alpha' quality)
  • Aztec ('alpha' quality)

To scan codabar format pass the intent extra the format as explained below

/**
* Comma-separated list of formats to scan for. The values must match the names of
* {@link com.google.zxing.BarcodeFormat}s, e.g. {@link com.google.zxing.BarcodeFormat#EAN_13}.
* Example: "EAN_13,EAN_8,QR_CODE"
*
* This overrides {@link #MODE}.
*/
public static final String FORMATS = "SCAN_FORMATS";

intent.putExtra("SCAN_FORMATS", "CODABAR");


List of barcode formats supported by ZXING


/** QR Code 2D barcode format. */
public static final BarcodeFormat QR_CODE = new BarcodeFormat("QR_CODE");

/** DataMatrix 2D barcode format. */
public static final BarcodeFormat DATA_MATRIX = new BarcodeFormat("DATA_MATRIX");

/** UPC-E 1D format. */
public static final BarcodeFormat UPC_E = new BarcodeFormat("UPC_E");

/** UPC-A 1D format. */
public static final BarcodeFormat UPC_A = new BarcodeFormat("UPC_A");

/** EAN-8 1D format. */
public static final BarcodeFormat EAN_8 = new BarcodeFormat("EAN_8");

/** EAN-13 1D format. */
public static final BarcodeFormat EAN_13 = new BarcodeFormat("EAN_13");

/** UPC/EAN extension format. Not a stand-alone format. */
public static final BarcodeFormat UPC_EAN_EXTENSION = new BarcodeFormat("UPC_EAN_EXTENSION");

/** Code 128 1D format. */
public static final BarcodeFormat CODE_128 = new BarcodeFormat("CODE_128");

/** Code 39 1D format. */
public static final BarcodeFormat CODE_39 = new BarcodeFormat("CODE_39");

/** Code 93 1D format. */
public static final BarcodeFormat CODE_93 = new BarcodeFormat("CODE_93");

/** CODABAR 1D format. */
public static final BarcodeFormat CODABAR = new BarcodeFormat("CODABAR");

/** ITF (Interleaved Two of Five) 1D format. */
public static final BarcodeFormat ITF = new BarcodeFormat("ITF");

/** RSS 14 */
public static final BarcodeFormat RSS14 = new BarcodeFormat("RSS14");

/** PDF417 format. */
public static final BarcodeFormat PDF417 = new BarcodeFormat("PDF417");

/** RSS EXPANDED */
public static final BarcodeFormat RSS_EXPANDED = new BarcodeFormat("RSS_EXPANDED");

Tuesday 12 February 2013

Image Contrast android


From the original image:
Original Image
Original Image
I take contrast on this image:
Contrast = 100
Contrast = 100
Contrast = 50
Contrast = 50
First, calculate the contrast value: contrast = ((value + 100) / 100) ^ 2 (square by 2, or power 2).
Then do this for each color channel:
+ Take pixel color divided by 255
+ Minus 0.5
+ Multiply contrast value calculated above.
+ Plus 0.5
+ Multiply by 255
Here the implementation:

public static Bitmap createContrast(Bitmap src, double value) {
 // image size
 int width = src.getWidth();
 int height = src.getHeight();
 // create output bitmap
 Bitmap bmOut = Bitmap.createBitmap(width, height, src.getConfig());
 // color information
 int A, R, G, B;
 int pixel;
 // get contrast value
 double contrast = Math.pow((100 + value) / 100, 2);

 // scan through all pixels
 for(int x = 0; x < width; ++x) {
  for(int y = 0; y < height; ++y) {
   // get pixel color
   pixel = src.getPixel(x, y);
   A = Color.alpha(pixel);
   // apply filter contrast for every channel R, G, B
   R = Color.red(pixel);
   R = (int)(((((R / 255.0) - 0.5) * contrast) + 0.5) * 255.0);
   if(R < 0) { R = 0; }
   else if(R > 255) { R = 255; }

   G = Color.red(pixel);
   G = (int)(((((G / 255.0) - 0.5) * contrast) + 0.5) * 255.0);
   if(G < 0) { G = 0; }
   else if(G > 255) { G = 255; }

   B = Color.red(pixel);
   B = (int)(((((B / 255.0) - 0.5) * contrast) + 0.5) * 255.0);
   if(B < 0) { B = 0; }
   else if(B > 255) { B = 255; }

   // set new pixel color to output bitmap
   bmOut.setPixel(x, y, Color.argb(A, R, G, B));
  }
 }

 // return final image
 return bmOut;
}
Hope you enjoy it!

Image Brightness Android


The concept of brightness is rather simple, increasing/decreasing value of each R, G, B channel  together.
+ By increasing: image results brighter.
+ By decreasing: image results darker.
This is the ogirinal one:
Original Image
Original Image
Applying several type of brightness:
Bright = 30
Bright = 30
Bright = 80
Bright = 80
Bright = -60
Bright = -60
From idea to implementation is very easy, piece of cake !!!
public static Bitmap createContrast(Bitmap src, double value) {
 // image size
 int width = src.getWidth();
 int height = src.getHeight();
 // create output bitmap
 Bitmap bmOut = Bitmap.createBitmap(width, height, src.getConfig());
 // color information
 int A, R, G, B;
 int pixel;
 // get contrast value
 double contrast = Math.pow((100 + value) / 100, 2);

 // scan through all pixels
 for(int x = 0; x < width; ++x) {
  for(int y = 0; y < height; ++y) {
   // get pixel color
   pixel = src.getPixel(x, y);
   A = Color.alpha(pixel);
   // apply filter contrast for every channel R, G, B
   R = Color.red(pixel);
   R = (int)(((((R / 255.0) - 0.5) * contrast) + 0.5) * 255.0);
   if(R < 0) { R = 0; }
   else if(R > 255) { R = 255; }

   G = Color.red(pixel);
   G = (int)(((((G / 255.0) - 0.5) * contrast) + 0.5) * 255.0);
   if(G < 0) { G = 0; }
   else if(G > 255) { G = 255; }

   B = Color.red(pixel);
   B = (int)(((((B / 255.0) - 0.5) * contrast) + 0.5) * 255.0);
   if(B < 0) { B = 0; }
   else if(B > 255) { B = 255; }

   // set new pixel color to output bitmap
   bmOut.setPixel(x, y, Color.argb(A, R, G, B));
  }
 }

 // return final image
 return bmOut;
}
Hope you like it!